


Add Automatic Read More With Thumbnail To Blogger

Almost every blogger or webmaster uses Automatic read more with thumbnail feature in their blog because it add more functionality and give a professional look to the blog. Beside this it has many advantages like it shows only post summary (excerpt or snippet) with thumbnail on the blog homepage, labels and archive page that increase your blog page views, it help to reduce blog load time of your blog by reducing the long lengthy posts into a short summary with first image of the post at homepage. It also help to reduce bounce rate of blogger blog because if reader is interesting to read the full post then he/she have to click on read more link hence less bounce rate. As you know now the benefits of adding read more link into blogger, let see how to add it with very simple steps.
Add Auto Read More To Blogger
- Go to your Blogger Dashboard > Template.
- Backup blog template to prevent the template by any crash during making changes to add read more.
- Click Edit HTML > Proceed.
- Check Expand Widget Template checkbox.
- Press Ctrl+F and find the below code in your template.
- Now search <data:post.body/> and replace it with the below code.
- Now preview your template and save.
</head>
and paste the below code just above / before it.
<script type="text/javascript">
var summaryConf = {
showImage: true,
imgFloat: 'left',
imgWidth: 120,
imgHeight: 90,
defaultThumb: 'https://blogger.googleusercontent.com/img/b/R29vZ2xl/AVvXsEhTnODLabTE_xXa3-hunT8sL4gkq_GT98d4vbq9Fwz0iRovJtWZ2cpIgnqQ5UdJMYrAnQwUK2nwYiB_W69942t-K60igZJuSE8jZwBgSrMLzJsZwXO9OMYA6kTja3d1e87IUiLn17Et3A4/s1600/no-thumb.jpg',
words: 65,
wordsNoImg: 80,
skip: 0,
showHome: true,
showLabel: true
};
</script>
<script type='text/javascript'>
//<![CDATA[
eval(function(p,a,c,k,e,r){e=function(c){return(c<a?'':e(parseInt(c/a)))+((c=c%a)>35?String.fromCharCode(c+29):c.toString(36))};if(!''.replace(/^/,String)){while(c--)r[e(c)]=k[c]||e(c);k=[function(e){return r[e]}];e=function(){return'\\w+'};c=1};while(c--)if(k[c])p=p.replace(new RegExp('\\b'+e(c)+'\\b','g'),k[c]);return p}('w 3(h){3.6=3.6||0;3.6++;4 g=i.j.k("/l/v/")==-1&&i.j.k("/l?")==-1,c=i.j.k("/l/v/")!=-1;5(3.6<=2.G){8}5(g&&!2.C){8}5(c&&!2.E){8}4 e=x.z(h),f=e.B("o");5(2.D){4 a=\'<o T="\'+2.J+\'" K="\'+2.L+\'"\';5(2.t!="y"){4 b=2.t=="p"?\' q="r:p;n:0 7 7 0"\':\' q="r:F;n:0 0 7 7"\';a+=b}a+=\' u="\'+(f.H>0?f[0].u:2.I)+\'" />\';4 d=3.9(e.m,2.M)}N{4 a="",d=3.9(e.m,2.O)}e.m=a+d+"..."}3.9=w(a,b){8 a.P(/<.*?>/Q,"").R(/\\s+/).S(0,b-1).A(" ")};',56,56,'||summaryConf|summary|var|if|count|5px|return|strip|||||||||location|href|indexOf|search|innerHTML|padding|img|left|style|float||imgFloat|src|label|function|document|no|getElementById|join|getElementsByTagName|showHome|showImage|showLabel|right|skip|length|defaultThumb|imgWidth|height|imgHeight|words|else|wordsNoImg|replace|ig|split|slice|width'.split('|'),0,{}))
//]]>
</script>
<span expr:id='data:post.id'><data:post.body/></span>
<b:if cond='data:blog.pageType == "index"'>
<script type='text/javascript'>summary("<data:post.id/>")</script>
<span style='float:right;padding-top:20px;'>
<a expr:href='data:post.url'>Read More</a></span>
<b:else/>
<b:if cond='data:blog.pageType == "archive"'>
<script type='text/javascript'>summary("<data:post.id/>")</script>
</b:if>
</b:if>
Customization: Below are some customization tips that you can do in the first code to achieve the following results.
- showImage: true, This code will show summary with thumbnail. If you don't want to show thumbnail then change true to false.
- imgFloat: 'left', To change image location replace left with right.
- imgWidth: 120, imgHeight: 90, Default width and height of the thumbnail. Change these values according to your need.
- defaultThumb: 'https://blogger.googleusercontent.com/img/b/R29vZ2xl/AVvXsEhTnODLabTE_xXa3-hunT8sL4gkq_GT98d4vbq9Fwz0iRovJtWZ2cpIgnqQ5UdJMYrAnQwUK2nwYiB_W69942t-K60igZJuSE8jZwBgSrMLzJsZwXO9OMYA6kTja3d1e87IUiLn17Et3A4/s1600/no-thumb.jpg', If there will no any image in the post then the default image will be show as a thumbnail. You can change it by replacing it with your own image url.
- words: 65, No of words shown along with thumbnail.
- wordsNoImg: 80, No of words without thumbnail.
- skip: 0, If you not want to show read more on some starting posts then change 0 with no. of posts. For example if you change 0 with 2, then read more function will not work for first 2 posts.
- showHome:true,Change true to false if you don't want to show read more on Homepage.
- showLabel:true,Change true to false if you don't want to show read more on Label Page.
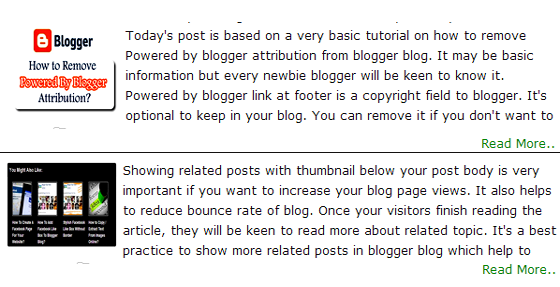
Output
Once you save your template, visit your blog. The read more link with thumbnail will look like this:
0 commentaires:
Enregistrer un commentaire